Drawing Triangles: Conventions and Mechanics
The Poster Problem “Triangles to Order” doesn’t pretend to instruct students in some of the conventions and mechanics they need to know to succeed. One problem is that the issues are often visual, so they’re hard to explain, especially to students. Another is that students may already know this material, so reteaching would be redundant. Finally, some of these ideas and skills are very simple; once you know them, they may need only a moment of teacher time for nearly everyone to understand.
But as a teacher, you need to know our assumptions and any underlying, deeper math. This document will fill you in.
Using a straightedge or ruler
You are an experienced teacher, so it should come as no surprise that many students do not know how to use a pencil and a ruler to connect two points accurately. Two ideas seem to be missing.
The obvious one is, to connect two points, it must be clear where the points are. Often, students draw one side for a triangle but are not very clear where that side begins and ends; the line kind of trails off. Encourage them to make definite points at the ends. Not giant blobs, just clear endpoints.
Less obviously, students often don’t realize that the line you draw will not appear at the edge of the ruler: it’s offset from the edge because the pencil lead does not fit snugly into the corner. It’s good, therefore, to learn this procedure or something like it:
- Place the tip of your pencil on one of the points you want to connect.
- Slide the ruler up to the pencil so it’s touching and pointed close to the other (“destination”) point.
- Adjust the ruler so that the “destination” point is the same distance off the edge of the ruler that the “starting” point is.
- Draw the line, keeping the pencil at the same angle.
Protractor woes
Using a protractor is hard, but it’s a good skill to learn. A particular problem for the classroom is that you may have a motley collection of protractors of different sizes and capabilities. For basic use, there are two main things to remember.
- You must center the protractor over the vertex of the angle you’re measuring or drawing. It may not be obvious to students where that center is on the protractor. On some, the center is on the edge, marked with a straight “tick.” On others, it’s inset from the edge, marked with a dot or cross.
- You must also align the protractor along one edge of the angle. Some students align the middle of the arc (often 90°) with the edge of the angle; doing so messes everything up.
On a more advanced level, students may need to make some calculation to draw accurate angles over 90°. For example, the protractor might not have 120° on its scale, or it might be on the “wrong” side. Students can try turning the protractor over, but it’s good practice to realize that 120° is 30° more than 90°, so you might have to use the number of the other side of the arc that’s 30° less than 90°, namely, 60°, to draw the angle.
Using guide lines
Careful students can sometimes be flummoxed when they try to draw a segment of a fixed length at a specific angle. The problem is coordinating rulers and protractors, especially if the segment is so short that its endpoint falls under the protractor.
The missing concept is guide lines—extra lines in the drawing that are not part of the actual figure, but that you need in order to draw it. Suppose you have three conditions: side AB, 5 cm long, a 60° angle at point A, and AC is 2 cm long.
- Draw the 5-cm segment and label its ends A and B.
- Center the protractor on point A and align it with AB.
- Make a mark at 60°. Now you’re done with the protractor.
- Draw a nice long, light line starting at point A and extending through the mark. This is a guide line.
- Measure 2 cm from A along the guide line. Mark that point C.
- Make darker lines connecting A to C and B to C.
Those same careful students have a tendency to erase the unused part of the guide line. Teach them not to do that. The guide line is good. It shows your thinking.
Naming points, segments, and angles
We traditionally name the vertices of triangles with capital letters. The name of the triangle is then the three letters, as in “triangle ABC” or even △ABC. We name each side with two letters. The sides are line segments, so we might say “segment AB,” or “side AB”, or even “line AB.”
We name each angle by its vertex. We can use an angle symbol with the letter, as in ∠A, which we read as “angle A.”
In high school, teachers get pickier.
- They would never call the side of a triangle “line AB” because lines have infinite length. They go on forever. The side is always a line segment.
- If there is any chance of ambiguity, they label angles with three letters, where the middle one is the vertex, as in ∠CAB (which we would call ∠A).
- They make the distinction between TTU_TriangleMechanics_ABbar.png (with the bar), which is line segment AB, and simply “AB” which is the length of that line segment. Since we’re using the labels to refer to the lengths, we’re in good shape.
- They also distinguish between ∠A, the angle itself, and m∠A (the measure of angle A), which is its size. That’s probably fussier than we want to be with seventh graders. We will say “the angle is 60°” and know that we really mean “the measure of” that angle.
The names don’t matter
These names are not an essential part of the triangle! They help us talk about the different points, sides, or angles, and not get confused. So if I re-labeled triangle ABC as triangle PQR, it would be the same triangle.
Order of points doesn’t matter for triangles
It’s not obvious, but the order of points makes no difference for triangles. For larger figures, such as quadrilateral PQRS, you have to name the points in order: PQSR is a different figure even though the points are in the same places.
As long as you go in order, however, it doesn’t matter where you start or whether you go clockwise or counterclockwise. For any quadrilateral PQRS, it’s the same as SPQR or RQPS.

Adjacency does matter
(See this tune-up on "Triangle Constraints" for related content.)
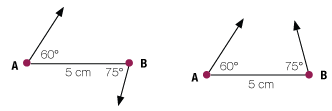
Suppose I know that AB is 5 centimeters. We pick a card and get an angle of 60°. We can assign it to ∠A, ∠B, or ∠C. The first two are equivalent—but the third is not.
The first two choices, ∠A and ∠B, are the same because either angle is adjacent to the side we know, side AB. (Kids don’t have to use that word, but if you use it yourself, they’ll start.)
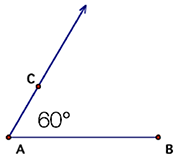
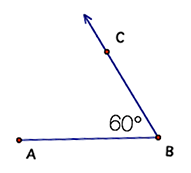
In the diagram, ∠A is 60° on the left. Point C can be anywhere on the ray that emerges from A and still meet the conditions. Likewise, if we picked ∠B, we would get the figure on the right.
When you get another condition, the triangles you make if you pick ∠A will be mirror images of the ones you make if you pick ∠B. So they will be the same size and shape. They’ll be congruent.
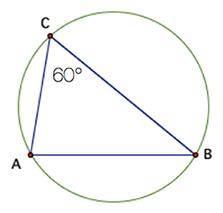
But if you pick ∠C, you have a completely different situation. That angle is opposite side AB, so it’s not anchored anywhere on our “known” side. All that matters is that the two sides of ∠C go through A and B, and that can happen in lots of ways.
In the sketch at right, if point C is anywhere on the arc “above” AB, angle C will be 60°. (Isn’t it wild that all of the possibilities for C lie on a circle? Students will learn more about this in high school.)
Insides and outsides of triangles
You will probably never have a seventh-grader bring this up, but just in case—
When we talk about an angle in a triangle, we almost always mean an interior angle. Doesn’t that seem obvious? Sure, but suppose we have AB = 5 centimeters and ∠A is 60°. Then we get ∠B = 75°. Angle B is 75° in both diagrams. Which one do we mean?
It has to be the right-hand diagram, because on the left we have no chance of making a triangle. Even if we extended the left-hand “bad” arrow upward, the interior angle would then be 105°, not 75°.
It is possible to describe, rigorously and mathematically, which way the angles have to go—but that’s way beyond the scope of what kids need to know here. The point is for middle-schoolers to learn to develop intuition about angles and lengths, and learn to visualize how they connect up (or don't connect) to make geometrical figures.
But should this issue of which way the angles turn arise, ask students where the inside of the triangle is. Then have them think about walking along the triangle itself, around and around. When you do that, you always turn the same direction at any vertex (left or right, it’s consistent) and that’s also the side that the interior of the triangle is on. The left-hand drawing has a right turn and a left turn no matter which way you go, and the inside of the triangle is on both sides of AB. That can’t be.